Monday, May 27, 2013

Bunnies!!!


I thought you might like to see how just a few little things can make a big difference in tiny bunnies! These are
all about the same size. Just look how ear placement, fabric choice, and outfit can make a big difference.
Do you have a favorite?? Mine is usually the one I've just finished.
All of these bunnies have found homes, but I hope there will be lots more!! Looking forward to see who shows up for the summer online show - a show which will include "friends!"

,

Wednesday, May 22, 2013

A Design Just For YOU!!!


As promised, I've designed a sunflower pin cushion just for my dear Blog visitors!! Let's make one, shall we?
For the pincushion in the photo above, I used worsted weight wool and a 4.25 mm hook. As gauge isn't important in this project, just use whatever yarn or thread you like and the hook which is recommended for that size. I've made a couple more in fingering yarn and crochet thread which will be great for broaches, I think.
As an overview, here's what you will be doing. There will be three parts to the pincushion. All the petals are made on one piece. The top and bottom are made separately and then joined with the petal piece in the middle. Here we go!!

Start with a magic circle (directions on you tube for lots of methods).
Round 1 - chain 2 and made 19 double crochets into the circle. Tighten the circle and join to the beginning chain 2 with a slip stitch. You should have 20 stitches in this round. (20)


 Round two - chain 2, *make two double crochets in the next double crochet of the first round, and one double crochet in the next stitch from the first round.* Repeat what is between * and * all around. You have added 10 stitches so you should have 30 stitches in the whole round. (30)


Now it's time to make the petals!! It may seem a little crowded, but you'll make a petal in each stitch of the second round.
Round 3 -*chain 2, 2 double crochets, triple crochet, chain 3, slip stitch in the 3rd chain from the hook, triple crochet, 2 double crochets, chain 2, slip stitch into next stitch.* Repeat * to * for each stitch of round 2 making 30 petals.


The really neat thing about making this round is that you can push the petals forward and backward making a really thick, full, flower.
You might take a moment to pinch the chain 3 part in the middle of the petal to form the pointy part of each petal. When you've finished all the petals, finish off with the last slip stitch.

Now for the center! You will be working in a spiral so you might want to use stitch markers to mark the rounds. Essentially, you will start with a circle of 6 stitches and then be adding 6 stitches to each round until the circle is as big as you wish to go in the middle of the flower. When it's big enough you will make a cushion to sit inside the flower by single crocheting into the back loops and then decreasing to close up the little cushion.
Again, start with a magic circle.
Round 1 - 6 single crochet into the circle (6 stitches)
Round 2 - 2 single crochets into each stitch (12 stitches)
Round 3 - *2 single crochets, single crochet* around the center (18 stitches)
Round 4 - *2 single crochets, single crochet, single crochet* repeat between * and * around (24 stitches)
Now you'll be starting to form the cushion. When you stop adding stitches, the sides will turn up.
Round 5 - single crochet into the back loops of each single crochet of round 4. (24 stitches)
Round 6 - single crochet into each single crochet of round 5 (24 stitches)
Round 7 - repeat round 6 (24 stitches)
With this last round the thickness of the sides of the cushion is made. If you want a ticker cushion, make more rounds here.
Now you will be closing up the back of the cushion.
Round 8 - *single crochet two stitches together* repeat around
Round 9 - repeat round 8
Round 10 - repeat round 9
Add stuffing as required for the puffiness you like!

As this little cushion will be open side down, there's no need to completely close it up. But if you wish to do so, just use a tapestry needle and piece of matching yarn and gather up the small hole and finish it off with a knot.

Now, you'll need a center back piece to make the cushion look really finished.
For this, just repeat the center front you've just made:
Crochet  again rounds 1 through 4.
You should have three pieces!

Layer the petals between the front and back centers and sew through the layers using a tapestry needle and the color yarn or threat you used for the centers. An earlier blog post shows this step if you'd like to look.

Please write if you have questions! I hope you will enjoy this pin cushion. I'm working on some smaller versions to use for decorations on hats, purses, or jackets, or just about anything!!
Please feel free to use this pattern in any way you wish. 

Thursday, May 16, 2013

Let's make some envelopes and Happy Birthday to the kitties!


I feel very indebted to the scrapbookers of the world whose passion has brought us so many wonderful products!

I bought a wonderful pad of paper after the Philly show to use for making my "thank-yous" and when I was done, I remembered making envelopes a few years ago. Back then, I used magazine pages, wrapping paper, empty gift bags and drew some of my own designs. Now we have this lovely paper that has a different design on each side! The envelope you make will already be lined!!

It's so simple, I thought you might like to see how you too can "wow" your correspondents by putting a one of a kind piece of art in their mailboxes.

First, using your favorite envelope, take it apart, flatten it out and make a template. A regular paper one will do, but if you have some quilters' template plastic (thank you to quilters for your products, too) - all the better!


Just make sure whatever paper you choose is big enough for the template. Trace the shape


and cut it out!


Use a straight edge to fold up the stick-y-out bits (you can use the template you've made for this) so that when folded all together, you have an envelope shape!!


Use a glue stick to secure the bottom to the side flaps. Only glue as high as the bottom flap comes up!


You can buy stick-on labels if the paper you've chosen is too dark or two shinny to write on. If the paper has a mat finish and is light in color - just put your address on that! When you've put your message inside....


Just use the glue stick to seal it up!! I'll bet you'll hear good things for whoever is lucky enough to get this artwork in the mail!!


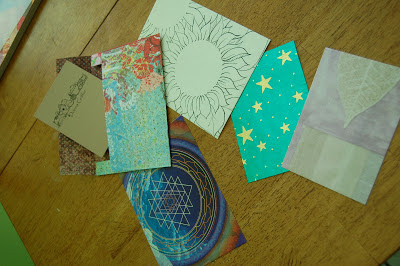
Here are some envelopes I've made using - starting from the left - a magazine page, the scrapbook paper, one of my designs on plain paper, wrapping paper (the shinny one with stars) and a decorative bag that was too pretty to toss! I hope you will try this out!!

and NOW!!!!!
Happy 1st Birthday to our little rescue kitties. It's hard to believe they were born a year ago under our deck!
All kitties had real tuna for dinner and the wee ones each got a special catnip toy.


and here's Cheeto! who has come to inspect the cake! The kitties didn't care much for the people cake, but loved the tuna! I wondered what the odds of getting a portrait of all of them on their birthday would be. Jason suggested photoshop would be a better option. He was right. I took many photos and all of them were blurred. Oh to have the energy of a yearling kitten!!

Saturday, May 11, 2013

Final Photos from Philly!


So that about does it for the Philly show!! Man oh man was I exhausted after all that fun! Now, it's on to the Teddies Worldwide online show and TBAI preparation!! I can't show you the online stuff but will let you peek into the workroom for other new bears and friends coming along. Next:  Have you ever made your own envelopes????? Come back soon!!!

Friday, May 10, 2013

More photos and I made a "doll!"

Another event at the Philly show was a "challenge" for bear artists to make a doll and doll artists to make a bear! A year ago when I agreed to do this, it seemed like a good idea! Actually, I had great fun creating "Stargazer" pictured above. He's a wee elf who has climbed atop Mushroom House Observatory with his telescope and teddy bear to observe the night sky. This isn't a really good photo, but you get the idea! Stargazer is made from polymer clay and his teddy has a mini bear fur head and a needle felted body. I wasn't expecting to have the piece adopted, but Valerie insisted Stargazer should move to her house in California. Thanks Valerie!

Now, before the other photos from the show, I'd like to list some links to sources I used for gathering goodies for my workshop on making mini hats:


tiny flowers and 2mm silk ribbon here - you might enjoy other trims on offer and be sure to check Stef's ebay site which is linked at the bottom of her home page - many mini treasures

this is the place for the unusual ribbon flowers I had plus the pretty multi-colored ribbon. I bought what I had at a quilt show the owner attended in February which was held in my area. Most everything is available on her website.

This is the place for the pattern for the petal hat. Debbie has lots of things of interest to mini makers!

Here are more photos from the gallery!


Big Winner! Joanne Livingestston's creation  picked by
artists and collectors! Magnificent!!


Michelle Lamb's beauty won with artists as one of the best!!


I have one more batch of photos and will list them soon!
I hope you enjoy seeing all these great creations! If you have questions about who's work is shown, leave a comment and I'll try to answer!!